Find this screen
Open: Cash Book > Enter Transactions > Grouped Transactions.
How to
Enter a group of customer receipts
- Choose the Bank account you've paid the money into.
- Choose Sales Receipt from the Posting type list.
- Enter the following details for the overall transaction that's posted to the bank account:
- Date
- Reference
- Description
- Exchange rate (for foreign currency bank accounts).
-
Click Add. Enter the details of each customer receipt.
-
Click Save or Save and Allocate. This saves the receipt to the group, but doesn't post it.
Note: If you allocate the receipt to an invoice, you can't edit or delete the allocated receipt.
Each transaction is added to the list on the Group transactions screen.
- To post the transactions, click Save.
Enter a group of supplier payments
- Choose the Bank account you've paid the money from.
- Choose Purchase Payment from the Posting type list.
- Enter the following details for the overall transaction that's posted to the bank account:
- Date
- Reference
- Description
- Exchange rate (for foreign currency bank accounts).
-
Click Add. Enter the details of each supplier payment.
-
Click Save or Save and Allocate. This saves the payment to the group, but doesn't post it.
Note: If you allocate the payment to an invoice, you can't edit or delete the allocated payment.
Each transaction is added to the list on the Group transactions screen.
-
To post the transactions, click Save.
Enter a group of customer refunds
- Choose the Bank account you've paid the money from.
- Choose Sales Payment from the Posting type list.
- Enter the following details for the overall transaction that's posted to the bank account:
- Date
- Reference
- Description
- Exchange rate (for foreign currency bank accounts).
-
Click Add. Enter the details of each customer refund.
-
Click Save or Save and Allocate. This saves the refund to the group, but doesn't post it.
Note: If you allocate the refund, you can't edit or delete it from the group.
Each transaction is added to the list on the Group transactions screen.
-
To post the transactions, click Save.
Enter a group of supplier refunds
- Choose the Bank account you've paid the money into.
- Choose Purchase Receipt from the Posting type list.
- Enter the following details for the overall transaction that's posted to the bank account:
- Date
- Reference
- Description
- Exchange rate (for foreign currency bank accounts).
-
Click Add. Enter the details of each supplier refund.
-
Click Save or Save and Allocate. This saves the refund to the group, but doesn't post it.
Note: If you allocate the refund, you can't edit or delete it from the group.
Each transaction is added to the list on the Group transactions screen.
-
To post all the transactions, click Save.
Edit a transaction in the group
To amend a transaction prior to posting, select it from the list and click Edit.
To delete a transaction prior to posting, select it from the list and click Delete.
Note: You can't edit or delete a transaction if you've allocated it.
Useful info
About grouped transactions
Use this to enter a single amount
When you use grouped transactions:
- Only one transaction is posted to you bank account.
- The individual payments and receipts are posted to the relevant customer or supplier accounts.
- You can allocate the receipts and payments as you enter them. However, you can't edit or delete an allocated payment or receipt.
- You have to post the grouped transactions when you enter them. You can't save them as a batch or post them later. If you want to do this, use the Batch transactions options.
- You can't enter nominal payments or receipts this way.
Jane has gone to the bank with all the cheques she's received from customers today. She's paid £500 in the bank account, which consists of three cheques for £100, £150 and £250 from three different customers.
To make things easier when she comes to reconcile her bank account, she records the cheques in Sage 200 using the Grouped Transactions option.
When she's finished, the following transactions have been added to Sage 200.
- A bank receipt for £500.
- A customer receipt for £100.
- A customer receipt for £150.
- A customer receipt for £250.
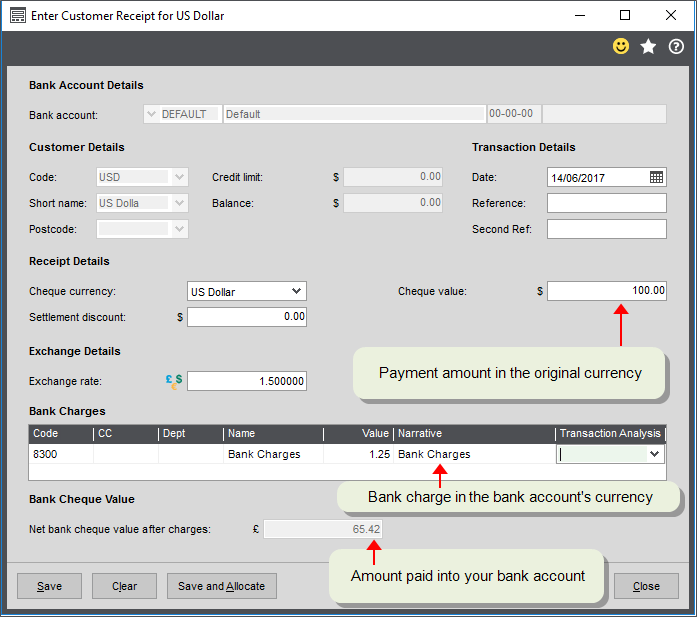
Foreign currency transactions
You can enter
When you choose a foreign currency , additional cheque currency, exchange rate and bank charges boxes are displayed.
If there is an exchange rate gain or loss between the transactions, this is dealt with by Sage 200 automatically.
Enter the following additional details:
-
Currency - The
-
Exchange rate - The current rate is displayed. Click
 to change this.
 - Bank charges - Enter if applicable. Bank charges are entered in the same currency as the bank account.
-
Save the
- To save without allocating, click Save.
- To save and allocate it, click Save and Allocate.
What happens when I
Save a grouped transaction?
- All transactions have the same URN.
- A single transaction is posted to the bank account for the total value.
- Separate transactions are posted to the nominal, customer and supplier accounts.